
After you restore a few photographs you'll
begin training your eye to see the important characteristics of photographic
images that will make them good candidates for restoration. Here are three
things to watch for.
1.) Does the photo have a good tonal range? Tonal
range is the spectrum from light bright highlights to dark black shadows.
Good candidates for restoration have a good range of tones. As you'll
see, we'll be able to correct and improve the tonal range. Photos that
have a very limited range are typically very washed-out. If it were a
black and white photo it would appear to be primarily in the grey tones.
The photographic term for these photos is "flat" or very low
contrast.
2.) Is the photograph focused and sharp? It's pretty
easy to tell if a photo has sharp detail. Look for telltale clues like
clothing details and hair in a portrait. While you can slightly sharpen
a photo in Photoshop you can't generate details that aren't there to begin
with.
3.) If there is damage is it repairable?
Your ability to assess this aspect of a photograph will improve each time
you restore an images. A tear that seems impossible today may look like
an easy fix after you gain experience. Most old photos have signs of age
where spots or other damage has been casued by handling or just the deterioration
of time.
Generally speaking, this means scanning the photograph in a flatbed scanner. But you could rephotograph the image with a high quality digital camera. Whatever you use, keep in mind that you will never have more information about your photo than you do at this point of the process. The scan will not be as good as the origianl...that's the way it goes. Information or detail is lost in the process. We'll try to minimize this loss by making good desicions about scanning. I've provided inforamtion about resolution in previous lessons. Simply said, we want to scan our image at a resolution that will meet our needs for output. If you plan on restoring grandma's wedding picture and printing it out on a 600-800 dpi (dot per inch) printer then you'll want to scan the image at one third of that ouput resolution. So we're talking about 200-300 ppi (pixels per inch). You also need to take into account any enlargement of the image you intend to make. Don't bother using the scanner's enlargement function. You're a skilled Photoshop user and it (Photoshop) is much better at the enlargement process than your $89 scanner. The rule of thumb for enlargements is simple: Scan at 100% but increase the scanning resolution to accomodate your planned enlargement. So if you have a 4 x 4 photo original that you want to double in size then scan at twice your calculated resolution. So the output resolution I calculated above was about 200ppi for a 4x4.If I enlarge to 8x8 I'll need to have sacn my origianl image at 400ppi (still scan at 100%). Remember you'll do the enlarging in Photoshop. Image>Image Size (it's the most important window/palette in Photoshop). To complete this tutorial you will need to download the restoration file that I have posted in our Blackboard Assignments page. The image should be about 5 x 5 @ 150ppi.
You will need to save the final image (instructions are at the end of the tutorial )and send to me for credit.


The picture in the levels window is the histogram for your photograph. It's a "plot of all the pixels in the image based on a white to black scale...even colored pixels have a white, grey or black value. The plot for black is on the left and pure white is on the right. You can see in the photo that there are more dark tones that light tones...If you move both end sliders toward the center..the little triangle in toward the first rise in the pattern you'll see a significant change in the image. What levels does is reassign the tonal range. Basically it makes areas of the picture that are close to black really black and areas that are sort of white (teeth for example) really white. Try it and see the magic!

The levels adjustment has made a big improvement...there is also a short cut. Auto levels will give you a basic adjustment...better to just take a few seconds to do it yourself. Just look for things that should be white to be white...teeth and eyes are good indictators. Now try the Adjustments>Contrast and Brightness and see if you can improve the overall contrast in the photo. There's also an auto contrast if you're in a hurry.

Both these tools are used in conjunction with the brush
menu. The size of the tool tip or the area that is "fixed" is
based on the diameter and hard or soft character of the brush
you choose.
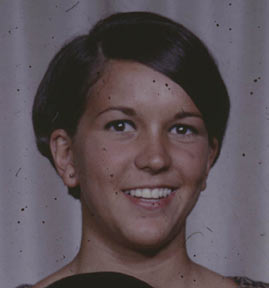
1.)With your working file open scale it up (I use the
magnifying glass) so you can see the flaws you want to fix such as the
dots to the right of the girl's face.
2.) Select the clone tool and pick a brush diameter of
10-20 pixels and soft. Brush menu is up at the top left of main window.
We're going to use the clone tool (sometimes referred to as the stamp
tool) to pick-up a good area of the picture and drop a copy of that good
area onto a spot or flaw. You can click many times and have more control
with a smallish brush size.
3.) Here's the trick...to set the area of pick-up move
your brush over a good area with the same color or pattern of the area
you want to fix. Hold down the option key (you'll see
the brush turn into a target looking icon). While still holding the Option
key down move the target icon over the area you want to fix and let go.
You've "set" the pick-up and drop-off "target" relationship.
If you click the mouse now, you'll see a a copy of the pick-up spot (brush
diameter) overlaid on your photo. This is really cool! The relationship
of the pick-up and drop off will stay the same if the aligned option in
tool options is selected so as you move the mouse so will the pick-up
point move. You'll first notice this when you overlay a dress pattern
on your subject's face...if you want to keep the pick-up point at a constant
locatoion deselect aligned in the tool option bar at the top of the window.
I find it best to keep on clicking, don't drag the brush. You'll have
to reset the pick-up point (option key) when you need to find a better
match for color or texture. As a general rule you'll find better matches
close to the area that needs fixing.

I've quickly applied the clone tool to the right side of the image and you can see big changes.


The final file needs to be saved as a jpeg at 72 ppi and sent to me by the end of the week!
Here's a review on saving files:
If you're going to print your photo from your computer then just save
it as a Photoshp .psd file. This retains all layer information and, although
the file is large you shouldn't have a problem printing. If you need to
send the file as an attachment to me (such as our Project 1..and future
projects) I want you to save the file as a jpeg file type. Always check
your image size (Image>Image Size) and resolution
to make sure you're sending a reasonably sized file. I think 8x10 is as
big as I want to receive and the 5x7 range is probably better. These are
images that I will have to eventually post on the web. Anyway...resolution
should be downsampled to 72 dpi too. When these adjustments have been
completed got to File>Save As and select the jpeg
file option. Another window will pop-up asking for the quality that you
want to save. Select 7. Jpeg files are compressed (made much much smaller)
even an 8 x 10 shouldn't be more than 400k..while it's full up photoshop
.psd origianl at 200 ppi is up around 6 megapixels. As always...save your
original too... just in case there are problems and I have to ask for
another copy or you need to fix the original.