Web Graphics |
If you ask why something works and you push back far enough, eventually everything seems to be based on contrast: the ability to distinguish one thing from another. Composition, sequencing, even legibility all rely on devices that affect the contrast between things.
— Chris Pulman, The Education of a Graphic DesignerWe seek clarity, order, and trustworthiness in information sources, whether traditional paper documents or Web pages. Effective page design can provide this confidence. The spatial organization of graphics and text on the Web page can engage readers with graphic impact, direct their attention, prioritize the information they see, and make their interactions with your Web site more enjoyable and efficient.
Visual logicVisual and functional continuity in your Web site organization, graphic design, and typography are essential to convince your audience that your Web site offers them timely, accurate, and useful information. A careful, systematic approach to page design can simplify navigation, reduce user errors, and make it easier for readers to take advantage of the information and features of the site.
Graphic design creates visual logic and seeks an optimal balance between visual sensation and graphic information. Without the visual impact of shape, color, and contrast, pages are graphically uninteresting and will not motivate the viewer.
But without the depth and complexity of text, highly graphical pages risk disappointing the user by offering a poor balance of visual sensation, text information, and interactive hypermedia links. In seeking this ideal balance, the primary design constraints are the restrictions of HTML and the bandwidth limitations on user access ranging from slow modems to high-speed connections such as Ethernet or DSL.
Screen resolution: Always 72dpi!
Screen resolution refers to the number of pixels a screen can display within a given area. Screen resolution is usually expressed in pixels per linear inch of screen. Most personal computer displays have resolutions that vary from 72 to 96 pixels per inch (ppi).
Images destined for print can be created at various resolutions, but images for Web pages are always limited by the resolution of the computer screen. Thus a square GIF graphic of 72 by 72 pixels will be approximately one inch square on a 72-ppi display monitor. When you are creating graphics for Web pages you should always use the 1:1 display ratio (one pixel in the image equals one pixel on the screen), because this is how big the image will display on the Web page. Images that are too large should be reduced in size with a sophisticated image editor like Adobe's Photoshop to display at proper size at a resolution of 72 ppi.
GIF files
In the early 1990s the original designers of the World Wide Web adopted GIF for its efficiency and widespread familiarity. The overwhelming majority of images on the Web are now in GIF format, and virtually all Web browsers that support graphics can display GIF files. GIF files incorporate a compression scheme to keep file sizes at a minimum, and they are limited to 8-bit (256 or fewer colors) color palettes. The GIF file format uses a relatively basic form of file compression that squeezes out inefficiencies in the data storage without losing data or distorting the image.
The strategy is to reduce the number of colors in your GIF image to the minimum number necessary and to remove stray colors that are not required to represent the image. A GIF graphic cannot have more than 256 colors but it can have fewer colors, down to the minimum of two (black and white).
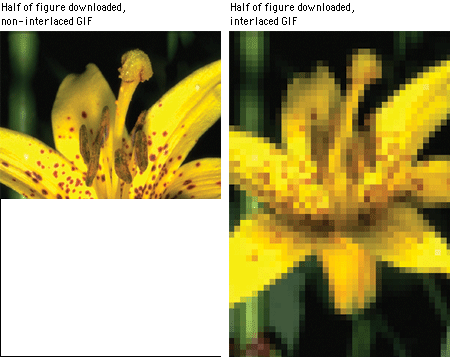
Illustration: Interlaced and non-interlaced GIF image
The conventional (non-interlaced) GIF graphic downloads one line of pixels at a time from top to bottom, and browsers display each line of the image as it gradually builds on the screen. In interlaced GIF files the image data is stored in a format that allows browsers that support interlaced GIFs to begin to build a low-resolution version of the full-sized GIF picture on the screen while the file is downloading. Many people find the "fuzzy-to-sharp" animated effect of interlacing visually appealing, but the most important benefit of interlacing is that it gives the reader a preview of the full area of the picture while the picture downloads into the browser.
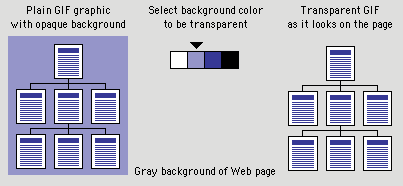
Transparent GIFThe GIF format allows you to pick colors from the color lookup table of the GIF to be transparent. You can use image-editing software like Photoshop (and many shareware utility programs) to select colors in a GIF graphic's color palette to become transparent. Usually the color selected for transparency is the background color in the graphic.
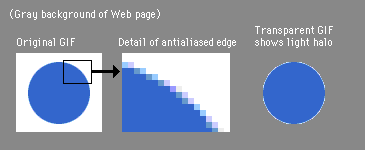
Illustration: How transparency works with GIF imagesUnfortunately, the transparent property is not selective; if you make a color transparent, every pixel in the graphic that shares that particular color will become also transparent. This can cause unexpected results:
Illustration: Diagram of GIF transparency with unexpected resultsIf you use an image-editing program like Photoshop to create a shape set against a background color, Photoshop will smooth the shape by inserting pixels of intermediate colors along the shape's boundary edges. This smoothing, or anti aliasing, improves the look of screen images by softening jagged edges. Trouble starts when you set the background color to transparent and then use the image on a Web page against a different background color. The anti aliased pixels in the image will still correspond to the original background color.
JPEG graphics
The other graphic file format commonly used on the Web to minimize graphics file sizes is the Joint Photographic Experts Group (JPEG) compression scheme. Unlike GIF graphics, JPEG images are full-color images (24 bit, or "true color"). JPEG images have generated tremendous interest among photographers, artists, graphic designers, medical imaging specialists, art historians, and other groups for whom image quality is paramount and where color fidelity cannot be compromised by dithering a graphic to 8-bit color. A newer form of JPEG file called "progressive JPEG" gives JPEG graphics the same gradually built display seen in interlaced GIFs . Like interlaced GIFs , progressive JPEG images often take longer to load onto the page than standard JPEGs, but they do offer the reader a quicker preview.
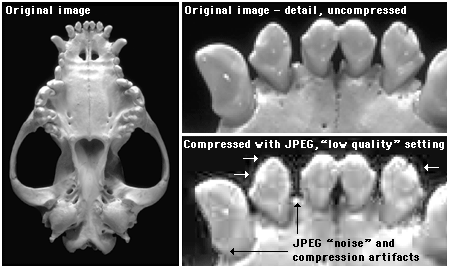
JPEG compression uses a sophisticated mathematical technique called a discrete cosine transformation to produce a sliding scale of graphics compression. You can choose the degree of compression you wish to apply to an image in JPEG format, but in doing so you also determine the image's quality. The more you squeeze a picture with JPEG compression, the more you degrade its quality. JPEG can achieve incredible compression ratios, squeezing graphics down to as much as one hundred times smaller than the original file. This is possible because the JPEG algorithm discards "unnecessary" data as it compresses the image, and it is thus called a "lossy" compression technique. Notice in the example below how increasing the JPEG compression progressively degrades the details of the image:
Illustration: JPEG noise and compression artifactsThe checkered pattern and the dark "noise" pixels in the compressed image are classic JPEG compression artifacts.
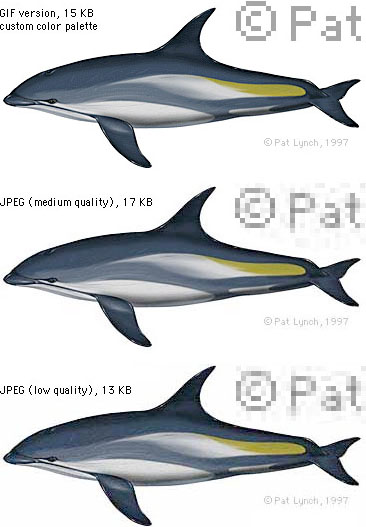
Another example of JPEG compression is shown below. Note the extensive compression noise and distortion present in the bottom dolphin — the download time saved is not worth the degrading of the images.
Illustration: Comparison of GIF and JPEG compression
Save your original un-compressed images!Once an image is compressed using JPEG compression, data is lost and you cannot recover it from that image file. Always save an un-compressed original file of your graphics or photographs as backup.
JPEG image artifactsThe JPEG algorithm was optimized for compressing conventional pictorial photographs and is also good at handling complex illustrations. Photos and artwork with smooth color and tonal transitions and with few areas of harsh contrast or sharp edges are ideal for JPEG compression. Yet most page design elements, diagrams, typography within images, and many illustrations are composed of hard-edged graphics and bright color boundaries that are seldom encountered in photographs.
When compressed with JPEG, diagrammatic images such as interface graphics show a noise pattern of compression artifacts around the edges of shapes and text (c, above). The JPEG algorithm is best at compressing smooth tonal transitions and cannot properly reproduce the harsh transitions at the edges of diagrammatic graphics.
Advantages of GIF files
* GIFs of diagrammatic images and illustrations look better than JPEGs
* GIF supports transparency and interlacing
Advantages of JPEG images
* JPEG produces excellent results for most photographs and complex images
* JPEG supports full-color (24-bit, "true color") images
Optimizing/Compressing Web Graphics
The secret of shrinking images is the reduction of bit depth, resolution, and dimension while preserving image quality. This classic size-versus-quality trade off is the key to the art and science of graphics compression.
Compression using Photoshop
Compression algorithms are used to re-encode data into more compact representations of the same information. In other words, fewer words are used to say the same thing.
There are 2 main image files as a result of compression: jpgs and gifs.
Both have a smaller file size after going through the compression. Photographs look better compressed as a jpg while illustrations and graphics look better as a gif. But the rule is "you decide"- based on looks, size and downloading time.
how to compress your images (jpgs with a high res, psd, tifs) in Photoshop:
- Once you are happy with the image including its dimensions (remember that for the web you want to keep images small in dimension as well as resolution) go to File/Save for Web and Devices.
- You enter a screen that displays 1 - 4 images. This depends on which tab is selected on the top of the window. Choose to display 4 versions of your image from the top.
- Now your screen is decided into four windows, each displaying the same image. The first one on the left is the original, indicated on the bottom of the window. You can also see the file kind and size for each image and the time it would take for the image to download = become visible if it were on a web site.
- On the right side you can see different pull and drop down menus, which are the settings
for compressing the image.- Select the second image, next to the original and see if it currently displays a jpg or gif compression, by checking the settings on the right or viewing the info below the image. View the size and downloading time and also compare the image to the original.
- Select the image below by clicking once. It will be surrounded by a blue border. If it currently displays a
gif compression change it in the first drop down menu on the right to "jpg". If it displays a jpg change
the settings to "gif".- Play with different settings for jpg: Low to high
for gif: take out colors by finding the pull down that displays numbers of colors (265 - 2)
NOTE: only gif images can have a transparent background (check transparency)- Once you have selected the settings that keep your file size small and downloading time short and
yet the image looks still pretty good just click "save" and save the image into the rootfolder of your web site. I usually have a folder called "images" to organize my files.
All images that go through this process, gifs and jpgs will have a resolution of 72dpi.
