Photoshop for Novices
Please refer to reader!!!
Outline:
back to top
The Toolbox
|

|
The first time
you start the application,
the toolbox appears on the left side of the screen.
Some tools in the toolbox have options that appear in the context-sensitive
options bar
underneath the menu bar.
The toolbar contains tools that let you use type,
select, paint, draw, sample, edit, move, annotate,
and view images. Other tools in the toolbox allow
you to change foreground/background colors,
work in different modes, and jump between Photoshop and ImageReady
Icons with a little arrow have hidden modifications:
Click/hold on those tools and see other choices.
|
working with tools
You select a tool by clicking its icon in the toolbox.
A small triangle at the lower right of a tool icon indicates hidden tools.
Positioning the pointer over a tool displays an 'Alt' tag containing the tool's
name
and keyboard shortcut.
To show or hide the toolbox:
Choose Window / Show Tools or Window / Hide Tools.
To move the toolbox: Drag the toolbox by
its title bar.
To select a tool:
back to top
Tools Basics
The Toolbox contains 4 main sections of tools. Some tools are used often,
others are more specific.
- The first section contains selection tools, the move tool
and the slice tool.
Marquee tools make rectangular, elliptical, single row,
and single column selections.
Move tool moves selections, layers, and guides.
Lasso tool can be used as a freehand selection tool, as a polygon
(straight lines) selection tool or as a magnetic selection tool that sticks
to an outline..
Crop tool cuts images
Slice tool slices images into pieces to reduce their download time
on the internet.
- The next section contains the painting and retouching tools.
Paintbrush tool paints brush strokes (paintbrush and pencil
are under one icon)
Pencil tool paints hard-edged strokes.
Airbrush tool paints soft-edged strokes.
Eraser tool erases pixels to transparency if transparency
in the layers palette is unlocked and to background color if transparency
is locked.
Paint bucket tool fills areas with the foreground color.
Gradient tool (underneath paint bucket) creates gradients
- The third section contains shape/vector tools.
Shape tools are vector based and create new layers by default.
Direct selection tool selects anchor points
Text tool creates text
Pen tool creates and modifies anchor points and paths (see hidden
tools)
Shape tool creates shapes which are based on paths
- The fourth section contains general tools, which help organizing
the workflow:
Note tool gives you a little window to take notes.
Eyedropper tool samples colors in an image (also called
color picker)
Hand tool moves an image within its’ window.
Zoom tool magnifies and reduces the view of an image. To
zoom out hold the apple or alt key.
|

|

Marquee Tool: selects rectangular or circular selections |
|

Move Tool: moves objects on highlighted layers |
|

Magic Wand: color selections (similarly colored
areas) |
|

Pencil, Airbrush and Brush: drawing tools with different stroke
quality |
|

Eraser: erases using the background color defined
in the color icon of the toolbox. |
|

|
- Gradient: fills with gradient
- Bucket: fills with solid color
|
|

Color Picker: samples colors into color icons
|
|

Magic Wand: Zoom in Zoom out |
To set Preferences for the tool pointers
When you select most tools, the mouse pointer matches the
tool's icon. The marquee pointer appears by default as cross-hairs, the text
tool pointer as an I-beam, and painting tools default to the Brush Size icon.
Under Edit/Preferences you can choose to set your cursor
appearance to:
· Standard
(displays the tool icon)
· Precise
(displays cross-hairs )
· Brush
(displays the actual brush size)
The standard view is the default .
back to top
Selections
Making selections in Photoshop is as important as creating imagery.
It’s the first step of image manipulation. There are several ways to make
selections,
which you will choose according to the situation.
The selection tools accessible through the toolbar are:
-
Marquee tool: to select rectangular or
circular areas.
-
Lasso tool: Freehand selections.
-
Polygonal lasso: straight-line selections.
-
Magnetic lasso tool: makes selections
by moving along a color ranged shape.
-
Magic wand: selects ranges of color.
Note:These tools are bitmap
selection tools . They select areas of pixels.
As we start to work with vector graphics we will use the path selection tool.
Using the Select menu in the menu bar
You can use commands in the Select menu to
-
select all pixels
-
deselect
-
reselect,
-
inverse a selection.
To select all pixels in a layer within the canvas boundaries:
1 Select the layer in the Layers palette.
2 Choose Select / All. (Apple/A)
To deselect selections, do one of the following:
-
Choose Select / Deselect. (Apple/D)
-
If you are using the rectangle marquee, rounded rectangle
marquee ,
elliptical marquee, or lasso tool, click anywhere in the image
outside the selected area.
More selection options
-
To reselect the most recent selection choose
Select / Reselect.
-
To increase a selected area :Hold down the
shift key after you made a selection and want to increase it.
-
To decrease a selected area :Hold the apple
key after you made a selection and want to decrease it.
Note: If an area
is selected (marching ants) the rest of the image "locked". Even
if you highlight a new layer the selection will be relevant and you will only
be able to use tools within selection.
Apple/D: always deselect after you finished editing.
back to top
The Options Bar
Working with the Options Bar
The options bar is located right underneath the
menu bar.
Most tools have options that are displayed in
the tool options bar.
The options bar is context sensitive and changes
as different tools are selected.
Some settings in the options bar are common to several tools
(such as painting modes and opacity), and some are specific to one tool
(such as the Auto Erase setting for the pencil tool).
To display the tool options bar do one of the following:
Note: You can double-click the title bar at the left edge to collapse the
options bar, showing only the tool icon.
Example: Lasso options bar

To return a tool or all tools to the default settings:
Other users might have chosen some specific settings for one or more tools.
You might try to use a tool and it doesn't’t work the way you expect it to.
To reset the tool to its default settings do one of
the following:
- Click the tool icon on the options bar, and then choose Reset Tool or Reset
All Tools from the context menu.
- Choose Edit / Preferences / General, then click Reset All Tools.
back to top
Color
In the toolbar, underneath the hand and magnification glass
are the color icons ,
which always display a fore and
background color.
Use the little arrow to switch foreground to background.
The foreground color is the color most tools will work with.
The eraser erases by default using the background color.
By clicking on the little black/white icon you can switch to
black and white.
To choose a new color:
To choose a new fore or background color double click the foreground
or background color icon.
The color picker window opens.
Use the slider to choose a color value. If you click in the
orange part of the slider
the big window will display all shades of orange from yellow to red, which
are available.
Choose a color by clicking in an area with the cursor. You will see the color
displayed in
a color field.
Click ok.
When creating images for the Internet use only Web safe colors
!!!
Not every computer displays millions of colors. The display varies
from platform to platform
and from browser to browser. There is a limited amount of colors, consistently
displayed
under all conditions. These colors are all part of the web safe color palette.
When you choose
a new color in Photoshop and are working for web purposes make sure
the little web safe check box is checked in the
color picker window.
back to top
Creating new images
The File/New command lets you create a blank image.
To create a new image:
Choose File / New. The image dimensions and resolution displayed in the
New Image window are based on the last image that was created.
-
Set the width and height in pixels (web) or
inch (for print) .
-
Set the resolution: If you work for the web
75dpi is fine.
Print resolution can be over 1000 dpi.
-
Set color mode: RGB is used most commonly.
-
Select an option for the color of the background layer:
White to fill the background or first layer with white, the default
background color.
Background Color to fill the background or first layer with the current
background color.
Transparent to make the first layer transparent, with no color values.
The resulting document will have a single, transparent layer as its contents.
Click OK.
back to top
About Layers
It’s like working on transparent pieces of paper.
You draw different shapes on each of them and put them on top of each
other:
it looks now as if all the shapes are on the same piece.
Layers make it possible to move and modify objects
independently from other content.
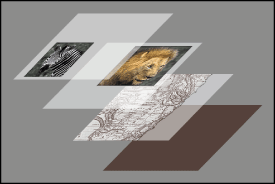
Think of layers as sheets of acetate stacked one on top
of the other.
Where there is no image on a layer (that is, in places where the layer is
transparent),
you can see through to the layers below.

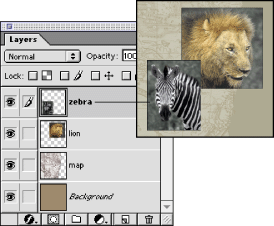
The zebra is on the topmost layer.

Transparent areas on a layer let you see through to the layers below.
You can draw, edit, paste, and reposition elements on
one layer
without disturbing the others. Until you combine, or merge,
the layers, each layer remains independent of the others in the image.
You can experiment freely with graphics, type, opacities,
and blending modes. There are three different kinds of layers:
Background Layer
A new image in Photoshop has a single layer.
This layer is called the background layer and is analogous to the base layer
of a painting.
The background layer is locked and you cannot change its' position in the
stacking order
nor can you apply a blending mode or opacity to a background layer unless
you unlock it.
To unlock a background layer
double click on the layer icon in the layers palette and
enter a layer name into the pop up window.
Click ok.
Advanced
Additionally, Photoshop supports adjustment
and fill layers.
You can apply sophisticated effects to layers using masks, layer clipping
paths,
and layer styles. In ImageReady, you can also use layers to create rollover
states
and animations.
When you transfer a layered image between Photoshop and
ImageReady, all layers,
layer masks, layer clipping paths, layer styles, and adjustment layers
are preserved.
Although adjustment layers and fill layers can be applied and edited only
in Photoshop,
they can be viewed in ImageReady. Layer clipping paths can be created
with either Photoshop or ImageReady, but Photoshop provides more support
for editing them.
Using the Layers palette
The Layers palette lists all layers in an image, starting
with the topmost layer.
You can use the Layers palette to
...layers
A thumbnail of the layer's content appears next to
the layer name.
The thumbnail is updated as you edit. You can make changes only to the active
layer,
and only one layer can be active at a time. Active layers are dark blue.
Note:Always check in the layers palette
if you are working on the right layer .
How to:
Insert new Layer: by clicking the layer
icon on the bottom of the palette.
Name Layers: Cmd/click on the layer to
get the layer properties window
Move Layers: Move objects behind or on
top of each other.
Drag
+ drop the layer in the layers palette.
Hide Layers: Make them temporarily invisible.
Click the eyeball
Lock Layers: Make them temporarily un-editable.
Select Layer, click last lock icon
Delete Layers: drag the layer into
the trash can.
Link Layers: By clicking the little
link icon next to the layer.
Objects
on linked layers will move together.
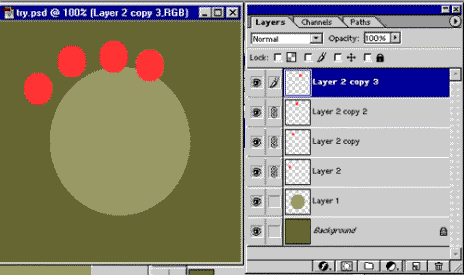
This example shows that the
image contains six layers:
-
The background layer is always locked.
You can’t move it.
By double clicking and naming it in the properties window you can unlock
and move it.
-
The red dot layers are linked=
if you move one red ball in the document window
all of them will move.
-
The eye icon shows that all layers are
visible.
-
With the move tool you can directly move the object
in the image if the layer is highlighted.
History palette
Cmd/Z: Undo the last step
Shift/Cmd/Z: Undo more then one step, go backward
Another way to move easily between current and older states of a file
use the
History Palette:
The History Palette keeps track of the commands applied
to a file.
The History Palette lets you undo multiple steps
.
Under Edit/Preferences
the number of memorized history steps can be defined.
-
The more steps stored in the history palette, the
larger the file.
-
The History palette clears when a file gets closed.
Advanced
There are two different kinds of history: the non-linear
and linear mode.
The history mode can be changed in the options window of the history palette.
Non-linear state is useful if you want to keep certain
steps in your history palette and clean out others because that will not affect
your latest state.
To clear history and win memory, go to edit/purge/history.
back to top
Image size + canvas size
Image size: changes size of the image, pixels will
be added or deleted.
Canvas size: image remains same size but space around the image will
be added or taken away.
Crop : cut off unnecessary space around the sides. Use the crop
tool.
Rotate canvas: turn the whole image.
back to top
Filters
To use a filter, choose the appropriate submenu command
from the Filter menu.
These guidelines can help you in choosing filters:
· The last filter chosen appears at the top of the menu.
· Filters are applied to the active, visible layer.
· Filters cannot be applied to indexed-color images.
· Some filters only work on RGB images.
back to top
Color modes
A gamut is the range of colors
that a color system can display or print.
The spectrum of colors seen by the human eye is wider than the gamut
available in any color model.
A color that can be displayed in RGB mode may be out-of-gamut,
and therefore unprintable, for your CMYK setting.
Photoshop automatically brings all colors into gamut when
you convert
an image to CMYK. But you might want to identify the out-of-gamut colors
in an image or correct them manually
before converting to CMYK.
In RGB mode, you can identify out-of-gamut colors in the
following ways:
-
In the Info palette, an exclamation point appears next
to the CMYK values
whenever you move the pointer over an out-of-gamut color.
-
In both the color picker and the Color palette, an alert
triangle appears
and the closest CMYK equivalent is displayed whenever you select
an out-of-gamut color. To select the CMYK equivalent,
click the triangle or the color patch.
RGB: the RGB gamut contains colors that can be viewed
on a computer or television monitor (which emits red, green,
and blue light)
All options and filters in photoshop are accessible
It makes most sense to work in the RGB mode
CMYK: The CMYK gamut is smaller, containing only colors that can
be printed using process-color inks. You will convert your RGB file
into CMYK if you want to print it
Index: color palette of 256 colors, no layers, web palette
back to top
About bitmap images and vector graphics
Computer graphics falls into two main categories - bitmap
and vector.
You can work with both types of graphics in Photoshop; moreover,
a Photoshop file can contain both bitmap and vector data.
Understanding the difference between the two categories
helps as you create, edit, and import artwork.
Bitmap images--technically called raster
images use a grid of colors
known as pixels. Each pixel is assigned a specific
location and color value.
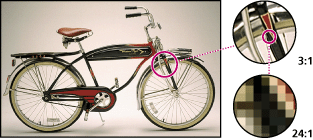
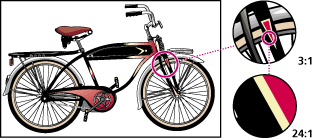
For example, a bicycle tire in a bitmap image is made up of a mosaic
of pixels
in that location. When working with bitmap images,
you edit pixels rather than objects or shapes.
Bitmap images are the most common electronic medium for
continuous-tone images,
such as photographs or digital paintings, because they can represent subtle
gradations
of shades and color. Bitmap images are resolution-dependent--that is, they
contain
a fixed number of pixels. As a result, they can lose detail and appear jagged
if they
are scaled on-screen or if they are printed at a lower resolution than they
were created for.

Bitmap images are good for reproducing subtle gradations of color,
as in photographs.
They can have jagged edges when printed at too large a size
or displayed at too high a magnification.
Vector graphics are made up of lines and curves defined
by mathematical objects called vectors.
Vectors describe an image according to its geometric characteristics. For
example,
a bicycle tire in a vector graphic is made up of a mathematical definition
of a circle drawn
with a certain radius, set at a specific location, and filled with a specific
color.
You can move, resize, or change the color of the tire without losing the quality
of the graphic.
Vector graphics are resolution-independent--that is,
they can be scaled to any size
and printed at any resolution without losing detail or clarity. As a
result,
vector graphics are the best choice for representing bold graphics that
must retain crisp lines when scaled to various sizes--for example, logos.

Vector graphics are good for reproducing
crisp outlines, as in logos or illustrations.
They can be printed or displayed at any resolution without losing detail.
Because computer monitors represent images by displaying
them on a grid,
both vector and bitmap data is displayed as pixels on-screen.
back to top
Vector Tools
Creating and working with vector graphics replies
choosing a different set of tools,
because vectors are defined by paths and anchor
points. One section in the toolbar
contains those tools we use to create, select and modify graphics and Text
based on paths.
-
Path component selection tool : Selects
a whole path including the anchor points.
-
Direct selection tool: Selects specific
anchor points.
-
Pen tool: creates anchor points connected
by paths.
-
Freeform pen tool: draws freehand paths.
-
Add anchor point tool: ads anchor points
to existing paths.
-
Delete anchor point tool: deletes anchor
points from existing paths.
-
Convert anchor point tool: converts
corner to curve points and vice versa.
-
Text Tool: generates text based on vectors.The
options bar displays different settings of text flow. Choose warp text options
from the Text tool options bar to distort text.
-
Shape tool: creates different kinds
of vector shapes.
To apply certain Filters to text or shape layers the layers need to be rasterized:
Layer/Rasterize/Type
The Path Palette is the window where all paths are stored if saved.
In the Path Palette you can turn selections into paths or paths into selections,
add clipping paths to a layer and save paths as work paths.
Anti- aliasing
The Anti-alias PostScript option removes jagged edges from
a pasted
or placed selection by making a subtle transition between the edges
of the selection and its surrounding pixels.
Turning off this option produces a hard-edged transition between pixels.
To make text look very crisp you might want to uncheck anti-aliasing.
back to top
More about Layers and the Layers palette
The more complex your images get, the more you will work within the layers
palette.
You can apply a wide range of modifications to your images by altering
the layer information in the palette.
You need to learn to distinguish between different types of layers:
Bitmap layers: The basic layer
Shape layers: Layer that contains vector shapes.
The icon shows a cut out on solid background.
(These layers are based on layer clipping paths)
Text layers: Layer that contains vector text.
It’s signified with a “T”.
Layer effects: are visible as sub layers after being applied to a layer.
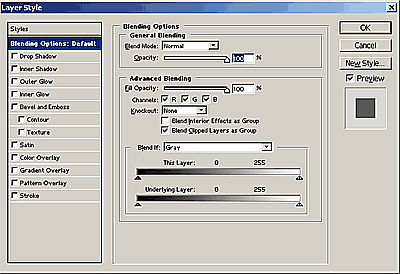
Layer effects
Can be applied to every layer by double-clicking the layer.
A window opens that gives many attributes to choose from,
which you can apply to the layer = objects on the layer.

To apply effects check the style you want to apply and then double click
the word next to the check box. That takes you to a new window where
you can specify attributes of that effect.
After you click ok you will see a layer style added
to the parent layer in the layers palette.
In the layers palette there are more layer specifications
available (top to bottom):
Blending modes:
A choice of modes to blend top layers into lower layers.
The appearance depends on the mode and on the pixels top and lower layers
contain.
Opacity:
You can modify the opacity of each layer. Use the slider to increase or decrease
transparency.
Locking modes:
-
Lock transparency: locks all transparent pixels of a
layer.
-
Lock image pixels: locks all opaque areas of a layer.
-
Lock position: locks objects on the layer.
-
Lock all: locks all
Layer drop down window (arrow on the right side of the palette)
Many commands are also available in the drop down menu as well as
in the context menu under Layer:
Merge layers: merges top layer with lower layers.
Merge visible: merges visible layers.
Flatten image: merges all layers.
Icons on the bottom of the layers palette:
1. Add layer style
2. Add layer mask
3. Add layer set
4. Add adjustment layer
5. Add new layer
6. Delete layer
back to top
Copying and duplicating
-
Copy Files: by choosing
Image/Duplicate a copy of the current file
opens.
-
Copy a Layer: drag a layer
to the insert layer icon on the bottom of the layer palette.
-
Copy objects by creating
new layers: hold option key while dragging an object with the move tool.
-
Copy objects on the same
layer: Select the object you want to duplicate, and then use the move tool
while holding the option key.
-
Copy Layers into another file:
open both files, select layer, drag the layer into the other file
back to top
Compression + Optimization: Save for the Web
A psd file is a large file because it contains layers which add to the information
= size of the file
To upload an image to the web you need to compress
it: usually you make it a gif or
jpg.
These are two different ways of compression but what they share is that your
file will contain
only one layer. The compression merges all the layers and reduces the file
size.
Also compressing images means to reduce color information.
jpg compression is different than gif compression.
gif compression: Shapes, illustrations, graphics are good for gif
compression.
Reduced to 256 colors.
jpg compression: use for Photographs and images with gradients and
feathered shapes.
back to top
Save/save as/ save for web
Save: saves a psd file
Save as: saves a copy. There are many options what
extensions you want
to add to the copy. It depends on your goals.
Save for web: saves an optimized gif or jpg.
To compress an image in Phtotshop you go to File/
Save for Web.
If you choose 4up you see 4 windows. The first window is the original.
The other three windows display three different choices of compression.
To choose a new setting select a window and modify current settings.
Just try different compression modes and look at the
file sizes in the save for web window.
That’s often convincing enough to make a decision.
On the bottom of each window you can see the file
size and the seconds this file will need to be visible (approximately)
on the Internet.
Note: remember to always first save your psd
file in case you need to edit it because
due to the compression process you loose all your layers.
back to top
How large is a file? Resolution and Image size
Resolution and Image Size:
An image contains a given number of pixels and its dimension and resolution
are interdependent.
The screen resolution is always 72 ppi and so an image with a high resolution
will be displayed larger on the screen than an image with the same dimensions
but a lower resolution. If you have an image of 5x6 inches with a resolution
of 600ppi it’s display on the screen will be accordingly large because
it displays it with a resolution of 72ppi.
File size : is the size of the image referring to its dimensions
and it’s resolution at the same time. The file size is displayed
in the Image Size Window as Pixel Dimensions.
You can change the image size via resolution or dimensions.
Always remember that your screen resolution remains 72ppi
and will display accordingly.
Note:To see the print size
of an image select the magnifying glass from the toolbox
and control/click (mac) or right/click (pc) in the image and select print size
from the drop down menu.

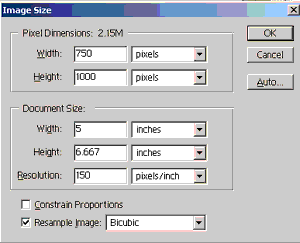
Under Image/Image size you can check and modify the file size (pixel dimensions),
print size (document size) and resolution.
Resampling:
When you resample up (or increase the number of pixels),
new pixels are added based on color values of existing pixels,
if the resample box is checked. If you downsample with the
resample box checked pixels will be taken out.
That happens either if you change the resolution or the dimensions.
Choose bicubic (best quality) Resampling refers to changing
the pixel dimensions (and therefore display size) of an image.
Note: Modifying the image size without resample
box checked will maintain the file size
but might decrease the quality of the image .Modifying the image size with
resample box
checked will alter the file size but might increase the quality of the image.
Knowing that, remember that the image dimensions you see on the screen
are relative and depend on many factors:
- Monitor resolution (alters the size of a pixel)
- Screen resolution (is always 72)
- Image resolution
All of the above combined with image dimensions.
Note: To view the print size of an image select
the magnifier, Cmd/click in the window
and choose print size from the drop down menu.
back to top
Image adjustment
All Photoshop and ImageReady color adjustment tools work essentially the
same way:
by mapping an existing range of pixel values to a new range of values.
The difference between the tools is the amount of control they provide.
The Brightness/Contrast, Auto Levels, Auto Contrast, and
Variations
commands change colors or tonal values in an image but are not as
precise or flexible as the high-end color adjustment tools.
They provide a quick and simple way to make overall adjustments.
back to top
Adjustment Layers
Adjustment layers are applied to layers similar as layer styles:
but they adjust all the layers underneath and can be edited
easily by double clicking the adjust icon in the layer or choose layers/change
layer content .
Applying an adjustment layer keeps the file more flexible than adjusting the
layer directly.
Note: The adjustment
layer has to be merged to be effective.
It’s a temporary layer and if it doesn't’t get merged the adjustment will
not be effective.
If you select only parts of the layer the adjustment
will only be applied to the selection.
Create an adjustment layer:
Click the black and white circle icon on the bottom of the layers palette.
The 'Alt' tag says “new fill or adjustment layer”.
Choose an adjustment mode like brightness/contrast.
back to top
More tools
History brush: draws history state by selecting a snapshot in the history
palette.
Rubber stamp: draws a copy of a defined area
Gradient: applies gradient to selected area or shape.
Smudge+Dodge: retouching tools.
Move tool: Auto select layer and set bouncing box
Context menu:
Edit/Fill: change fill
Edit/Stroke: edit stroke width
Edit/Transform: choices of scale, rotate….
Edit/Free transform: scale, rotate….
back to top
Masks
Masks are used to create complex and exact selections,
which isolate an area that you want to protect or apply changes to.
Because these selections can be time consuming they can be saved
as alpha channels or clipping paths and are accessible any time through those
palettes.
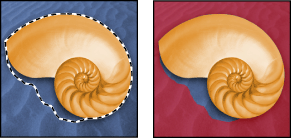
Quick mask
Quick Mask mode lets you edit any selection as a mask while viewing your
image.
The advantage of editing your selection as a mask is that you can use
almost any Photoshop tool or filter to modify the mask = selection.
Also your selections can become very complex.
To enter the quick mask mode you click the icon underneath the color
icons in the toolbox.
The color icons will change to black and white: black adds to the mask,
white subtracts. The mask itself displays in a transparent red.
Click the icon next to the quick mask icon to view selection.
For example, if you create a rectangular selection with the marquee tool
first,
you can enter Quick Mask mode and use the paintbrush to extend
or contract the selection.
Start with a selected area and use Quick Mask mode to add to or subtract
from it.
Alternatively, create the mask entirely in Quick Mask mode.
Color differentiates the protected and unprotected areas.
When you leave Quick Mask mode by clicking on the square
next to it in the toolbox the unprotected areas become the selection.
To create a mask:
- 1 Using any selection tool select the part of the image you want to change.
2. 
2 Click the Quick Mask mode button in the toolbox.
3. Modify the mask using any drawing
tool.
Switch between
black and white/ add and substract
4. Switch back to normal mode and view
selection
back to top
Alpha Channels
After creating an exact selection of part of an image it can be saved
and stored as an alpha channel in the channels
palette.
After you applied the mask, return to the selection mode and see
the marching ants instead of the transparent
mask color.
Go to Select/Save Selection. Name the selection.
If you now open the channels palette you will find your selection on a channel.
This selection can be reloaded into the image any time: Select/Load Selection
Choose from the pop up window the name of the selection you want to load.
Alpha channels add to the file size and should therefore
be used carefully.
back to top
Layer masks
The advantage of a layer mask is that it is always accessible through the
layers palette.
Unlike an alpha channel it can’t be loaded into other
layers.
It only applies to the layer with which it’s associated.
Like an adjustment layer a layer mask needs to be applied
to make it’s effects permanent.
-
To create a layer mask, click the layer mask icon
on the bottom of the layers palette.
-
To edit a layer mask, click the layer mask icon and
choose a drawing tool.
-
To invert a layer mask go to image/adjust/invert.
-
To move a layer mask without moving the whole layer
select the layer mask icon,
choose move tool.
-
To apply a layer mask click the layer icon and choose
“apply…”
-
Shift click the mask thumbnail to hide the mask
-
To see the layer mask instead of the image alt or
option click on the layer mask icon.
Can be used to let underneath layers shine through or mask parts of the
layer
Text selection Tool: (text_mask)
This tool can be used to mask layer around text.
back to top
To create brushes, patterns, swatches and styles
To create your own brushes or patterns choose a file you want to sample
a brush or pattern from, go to Edit/ Define Brush or Pattern.
To add swatches to the swatch panel choose a foreground color
and click the swatch icon next to the garbage can in the swatch panel.
If you want to work with a defined color palette using
the swatch panel will make that a lot easier.
To create new styles add a style to a layer, open the styles panel
and click on the new styles icon next to the garbage can.
back to top
Sampling from all Layers
By default, when working with the magic wand, smudge, blur,
sharpen,
clone stamp, or pattern stamp tool, you are applying color sampled
only from pixels on the active layer. This means you can smudge or sample
in a single layer even when other layers are visible, and you can sample
from one layer and paint in another one.
Alternatively, you can choose to paint using sampled data
from all the visible layers.
For example, you can use the clone stamp tool to clone an area
containing pixels from all the visible layers and layer sets.
To sample from all visible layers:
1 Click the magic wand tool (  ), smudge tool (
 ), blur tool (
  ), sharpen tool (
 ),
),
paint bucket tool (  ), or clone stamp
tool (
  ).
).
2 Select Use All Layers in
the options bar.
Note: When you are using tools
that sample image data, painting or editing in a new layer where there are
no pixels produces the best results when Use All Layers is selected.
back to top
