#2 Designing & Making your Index page: Create, upload and view
As an artist and designer you always want to start sketching out your idea before you put it into form. It's a requirement in the industry as well to being able to quickly conceptualize and draw. Before you actually build a page in Dreamweaver I want you to sketch out an idea for your home page, your portfolio page if you will. Since this site will be hosted on your own server you might want to build something that you are proud of even when this class is over. Even though it might not yet be possible for you to actually create in HTML what you are able to visualize on paper or digitally in a graphic application, this will set the tone for your designs.
1. Sketch a page design, think of layout, images color. Still keep it black and white. Rememeber that a screen has a landscape format so your design should reflect that. And don't think about what you are able to do, only think about what you desire to do:

2. Create a color composition of your black and white sketch. You can use water color, crayons, collage or create a digital composition in Painter, Photoshop, Illustrator or any other appliaction.
3. Give a brief summary of your design decisions and ideas.
4. Scan your image(s). Using InDesign or Word insert 2 images and text and save as a PDF file. Upload the PDF into the Dropbox of Assignment 2.
Dreamweaver
Now you can start building the home page for this course. It will not look at all yet how you envisioned it in your sketches but that's okay. To add content copy the bio you posted in week 1 and paste it into a word document. Save the file into a new folder located in the root folder of your site. Call this folder Assets and the text doc about-me.
Open Dreamweaver. When you look at your site files under Window/Files you should see your new Assets folder holding your about-me. doc or docx document.
Creating a New File
You are now ready to create your first HTML page. There are at least 2 ways to create a new document in Dreamweaver. The first one is to go to File/New then save the file into the root folder.
Another way to make a new file in Dreamweaver is to open the Site Files under Window/Files and right or control click on the root folder and choose New File from the drop down menu. Right on the spot you can name the file, which is equivalent to saving it using the first method.
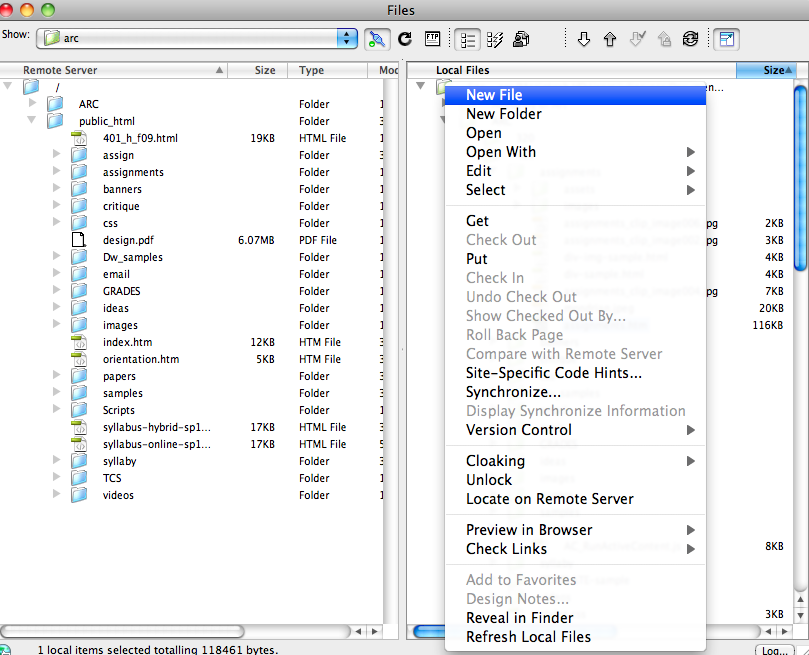
To get used to this second method please do the following:
- Go to Window/Files
- Right click (PC) or control click (Mac) on the root folder and choose New File.
- Name the new file index.htm.
- Double click index.htm in the files window.
- It opens as a white page. Click on Split view in the top left corner of the document window:

This shows you the design and code simultaneously. Copy/Paste your bio into this document.
(I recommend that you always view your web pages in split view to start understanding the code that is generated while working in the design view. )
- Go to Modify/Page Properties up in the content menu.
- Here, under the category Appearance (CSS) you can define the font face, size and color and the background color for the whole page. Go ahead and make your choices. Click Apply to see how it looks and make changes on the fly. Make sure that the text color is readable on the background color.
NOTE: At this point you can only work with one font color, size and family
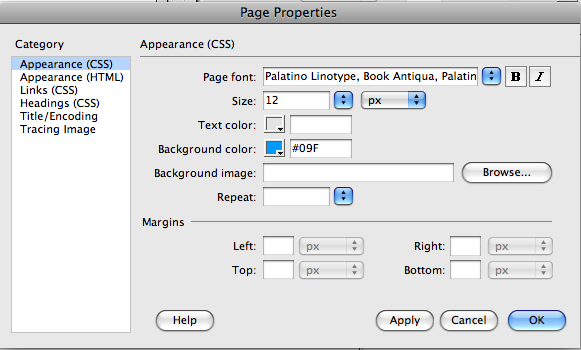
- Once you like your choices click OK and save your index.htm file.
- To see your file in a browser go to File/Preview in Browser and choose one of the listed browsers.
NOTE: To create and edit your list of Browsers go to Dreamweaver/Preferences and find the category Preview in Browser.
- Once you previewed your file in a browser locally and you are satisfied with your work you can upload your file to your server. Choose Window/Files and click the little square icon in the top right to see your remote and local columns:

- Click the little plug icon to connect to your server. Drag your index.htm file from your local site into your folder on the remote site.

The last thing to do is to check your page in a browser. Previewing it while it is still local on your computer is not the same. After uploading and seeing that your index page sits now on the remote side of your files window, open a browser and enter the URL you submitted in week 1:
NOTE: Bookmark this URL as it is your entry to all your work for this semester.
Assignment specifications: Post to the Assignment 2 Forum (1 Post!)
- Post a PDF called your-name_A2.pdf, including a short design description, a sketch and a color composition of your home page design idea.
- Upload your first home page called index.htm to your server and post your URL.
Assignment resources and study materials:
Lynda.com:
- If you use CS5: Essential Training: 4 + 5
- If you use CS6: Essential Training: 3 + 4
- Creating a First Web Site with Dreamweaver CS5 (for all): 2
Remember to participate in the weekly Discussion Board. Late Entries are not excepted.
Start Date: 1/28
Due Date:- 2/3
|
top
#3 File Structure: Create a functioning web site
This week you will learn how to set up a file structure and link the files to one another so that one can navigate though your pages. The File structure is an aspect of a web site that only the web designer sees. Often web sites are built in a team and therefore naming conventions and agreements where to put files are important. Make sure to name your files logically, with relatively short names, no spaces. I recommend using only lower cap letters. When you link files and you misspell the file name you will get the infamous"page not found " message therefor keep your names simple to reduce spelling errors.
The first step to building a functioning web site is to create all the files and folders you need.
You can do this right in the files window, repeating the steps you have taken before when you created your index page. Instead of making a file you are now going to create folders within the Site Files Window:
For now we don't do much with the assignments folder holding all the assignments starting with assignment#8.
Once you created the folders open the html folder and create 2 new files in there. Call them:
- assignments.htm
- about-me.htm
NOTE: Index.htm is the only file not in a folder.
You will now learn how to link these three pages so you can navigate back and forth from page to page.
- Open all three html pages. Title each page entering a name into the top of the document window. The Page Title is what you see in the title bar of a browser.
- Change the background color for each page through the Page Properties Window. Use different background colors for each page. Remember that you already colored the index page in your previous assignment.
- Type into each document: home assignments about me
To add space in between the words add several nbsp; tags (Insert/HTML/Special Characters/Non-Breaking Space)
NOTE: This is the only way in HTML to add more then one space between elements.
- Now starting with your index page, select the word home. Open Window/ Properties. This opens the Properties Panel. In the center of the wide window you can apply a Link. Insert a pound sign (#) into the Link area. This creates a blind link, meaning the text appears linked but when clicked the page will stay.
- Select the word assignments on the index page, browse to the assignments page using the same Link feature in the Properties. Instead of typing into the Link area click the browser icon. Browse to assignments.htm, which is located in the html folder. You now created a link from the index page to the assignments page.
See the path this created?

- Select the word about me and do the same. Using the Link feature in the Properties Inspector create a link from index.htm to about-me.htm.
- Open your two other documents and link the same text links to the respective pages.
- Preview your site in a browser. Based on page titles and different background colors it should be obvious to you if your links are working. Make sure to save all files before you preview them otherwise you will just see white pages.
- Upload your complete site (including the assignments folder with assignment#folders onto your server)
Assignment specifications: Post to the Assignment 3 Forum (1 Post!)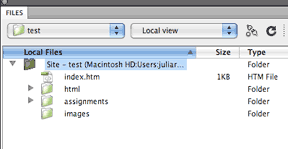
- Create a File structure
- Create assignments.htm & about-me.htm in the html folder.
- Add page titles to all three html docs: Welcome, About Me, Assignments
- Add 3 Links to each page, linked to respective pages
- Upload everything to your server.
Assignment resources and study materials:
Lynda.com:
- If you use CS5: Essential Training: 9
- If you use CS6: Essential Training: 8
- Recommendet ( for all): Photoshop for Web Design: 1
Remember to participate in the weekly Discussion Board. Late Entries are not excepted.
Start Date: 2/4
Due Date: 2/10
|
top
#4 Intro Style Sheets: Design the "About Me" page
You will now be introduced to ways of designing and formatting type and adding different color and text sizes to different pieces of text. To do so you will learn how to use Cascading Style Sheets, which are design instructions, to make the text appear a certain way. Until now you were only able to give all your text a specific font face, size and color. Learning about basic Style Sheets will enable you to apply design to your type. Be aware of your color choices, which colors work well together and how to create a nice design, that feels complete, attractive, thoughtful and professional.
For this assignment you will consider and write about the following questions:
- What is your professional and/or creative background ?
- What was the most interesting art project of your life ?
- What piece of art has inspired you (can be any creative project, like music, book, movie) and why?
- Why are you interested in web design?
- How can good or bad design have an impact on your life ?
NOTE: Keep your writings light and concise. Text on the web is always shorter then printed text .Don't forget to spell check everything. The spell check in Dreamweaver is under Commands/Check Spelling.
Open about-me.htm and go to Modify/ Page Properties. The page should have a background color chosen in the previous assignment and text appearance for all text. You can always change this here under Appearance (CSS). Now move to the Links category and define or change the look of linked text. Choose the same link appearance for all your three page. You have to open each page separately and go to Modify/Page Properties. Remember to save!
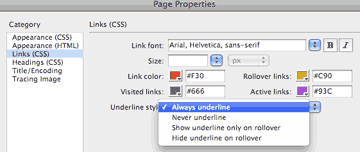
NOTE: Here you can also choose to have no underline for your linked text.
Now move to the category Headings (CSS). In this window you can define six headings, each of them appearing in different size and color. The font face will stay the same for all of them. Choose six different text looks that you will apply to different sections of you about-me text.
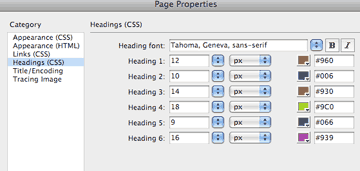
NOTE: Once you start applying your headings you might want to change colors. You can always go back into the Page Properties to do so or open the CSS window and make changes by double clicking the heading..
Paste your text into the about-me.htm page and format it using the formatting options in the HTML Properties of the Properties Panel. Insert paragraphs (return or enter) and line breaks (shift/return or enter.) For now all text will be aligned left, which is the default. You will be able to center text at a later date.


Using the Properties Panel in HTML Mode (see circled icon above ) allows you to apply the headings to different sections, words, sentences, paragraphs by selecting the text you want to apply the heading to and .choosing it from the Format drop down menu.
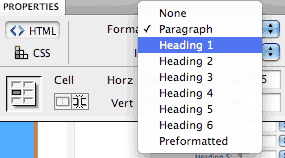
Choose different headings for different selections to make your text look interesting. Work creatively with all your options like:
- Content/ text color
- Font face and size
- Background color
- Arrangement and relationship of colored type
- Color of links on all three pages
The CSS Styles Panel
Go to Window/CSS Styles. You can view your link styles (also called rules) and heading styles in the CSS Styles Panel. Choose "ALL" and see all your styles defined so far.
There are different kinds of styles. The two main ones for formatting text are Classes and Redefined tags. Classes can be applied to any selection. When re-defining a tag the style/look will be applied each time the tag is used.
Making a Class
Go to the side drop down window to make a .class.
Choose "New". ( ignore the Go to Code highlight in this image)
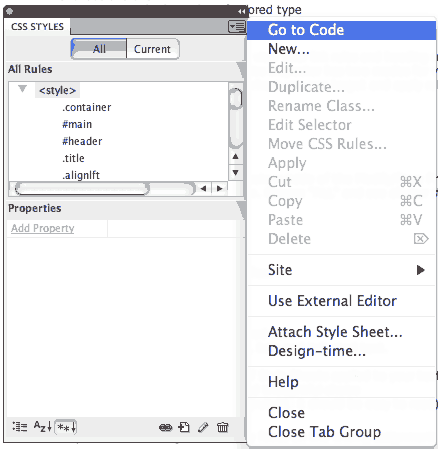
The New CSS Rule Window opens:
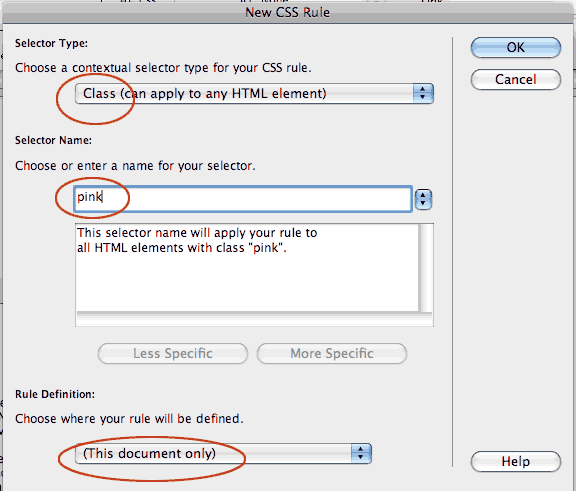
- Choose "Class" from the first drop down
- Give a class name (I often name it based on the color)
- Choose a location for the rule (For now choose "this document only")
- Click "Okay"
The CSS Rules Definition Window opens:
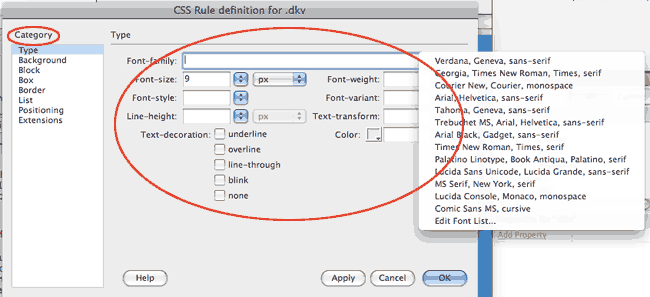
In this window you define the look of the style. On the left you see Categories.
Under "Type" choose a font face, color and play with other features.
Move to the "Box" Category and see that you can add spacing between letters and words.
Leave all other Categories for a later time. Click "Okay"
Now your new class should appear in Your CSS Panel. Find it there. When you select it you will get more info
in the bottom half of the Panel:
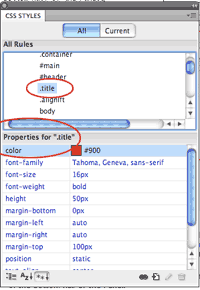
Now select text in your page design and choose "Apply" from the drop down in the top right of the CSS Panel, or right/control click on your class in the CSS panel.
The difference between a class and a heading is that the heading is a redefined tag, meaning any time I use the h1 tag (which means Heading 1) the heading will look as defined in Modify Page Properties or the CSS Panel .
A class can be applied to any text or element by selecting the text or element and applying the class.
Visually a class can be applied to one word within a line of text. A heading will always be applied to the whole line.
Assignment specifications: Post to the Assignment 4 Forum
- Folder: Root folder
- Doc name: about-me.htm
- Page title: About Me
- Interesting, creative and spell checked text.
- Use of HTML Properties: line breaks, paragraphs, bold, italic and indented text.
- Basic CSS/ Modify Page Properties: Defined Links and at least two Headings.
- More CSS: At least two classes defined in the CSS Panel.
- Text design, meaning an obvious and thoughtful choice
of background color and text color (rule#1: it should be easy to read).
Assignment resources and study materials:
- If you use CS5: Essential Training: 6 + 7
- If you use CS6: Essential Training: 6
- Creating a First Web Site with Dreamweaver CS5 (for all): 3
- CSS for Designers: This is a hand coding course that shows the ins and outs of CSS.
I recommend watching weekly tutorials to understand the importance of CSS.
Remember to participate in the weekly Discussion Board. Late Entries are not excepted.
Start Date: 2/11
Due Date: 2/17
|
top
#5 Tables
I'm sure you've noticed by now that HTML layout is rather limited and not comparable for example to InDesign or Illustrator, or even Word. This is because Web Pages are based on a different principle, which is HTML Code. You are learning how to integrate these new concepts. The web is always changing and in ten years building a web site might be similar in process to creating an image in Photoshop.
One of the big changes the web is currently experiencing is the disappearance of tables. Even though it is recommended to not use tables to design a page layout but only to hold tabular data you still have to learn about them. The reason is that tables will be around and have been around and at times you might decide to use them. You might get a job to update a site that is designed using tables.
You might have also noticed that so far you couldn't control the placement of your text very much. Tables or CSS positioned Div tags, which we will talk about later, are containers that allow you to spread your content on the screen.
The image below shows a table with three rows, and six cells. Each cell has a different background color and holds text that is styled by a different style sheet heading. This table could be as large as your screen and therefore would create a whole page layout.
heading 2
|
| |
|
heading 3
|
heading 4
|
| |
For your assignment I want you to create a table on your assignments.htm page.
Go to Insert/Table.
Copy what you see in the image below to define your table:

Table Height
As you might have noticed, there isn't a place to define the height of a table. Table height is really defined by content and therefor isn't an attribute that can be initially entered into table creation panel. However it is an adaquate attribute that can be written in code. The easiest way to give a table the height you wantin Dreamweaver is to drag its bottom left corner. To make it an exact height you can edit the number that was applied to the code through the Split view after you dragged. See the image below:
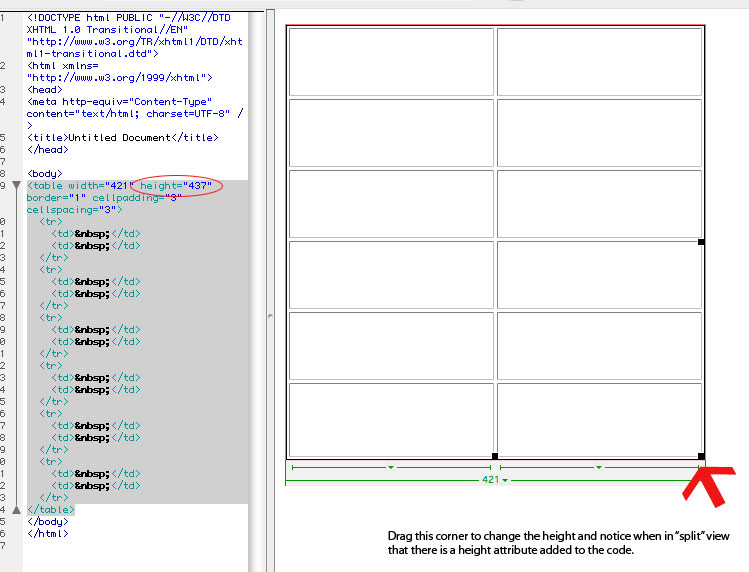
Here you see three stages of table creation: 1) the table just defined 2) background colors for all cells (you can drag to select more then one cell and color them all at the same time. 3) Assignment title and assignment links entered into each cell. You defined your links in Assignment#4 using the Page Properties Window.
From now on please link to all your assignments from this page using this table. Links 2 to 4 all lead back to the home page of your site.
Creating Tables Exercise
When you create a table it initially has a grid pattern. By merging and splitting cells you can create a layout. Find the icon below in the Properties when you select the table:
Select one cell and choose the split icon 
Or select several cells by dragging the mouse over them and choose the merge icon 
| cell 1 |
cell 2 |
| cell 3 |
cell 4 |
|
this cell is merged from
cell 1 and 2. I gave it a new bg color using the Properties Inspector. |
| cell 3 |
cell 4 |
|
this cell is merged from
cell 1 and 2. I gave it a new bg color using the Properties Inspector. |
| |
to get this cell I split cell 3 and gave it a new bg color |
|
|
Create three pages ( folder and files can be created in the Files Window) in the Assignment 5 folder. Into each page insert a different table, merging and splitting cells and using different background colors for cells . Link them to one another (table1.htm, table2.htm, table3.htm) the same way you did for assignment 3. Upload the folder and all its contents to the server. Link from your assignments page to the first table page in the Assignment 5 folder.
Assignment specifications: Post to the Assignment 5 Forum
1.
- Folder:Root folder
- Doc name: assignments.htm
- Page title:Assignments
- A table that holds all the assignment links. 2 - 4 linked to index. Assignment 5 linked to the first table page in the assignment 5 folder. Use # for all future assignmnent links.
2.
- Folder: Assignment 5
- Doc names: table1.htm, table2.htm, table3.htm
- Page titles: Table 1 - 3
- Link from the assignments page.
- 3 pages holding a table.
- Table design: split and merged cells with different background colors
- An obvious and thoughtful choice of color.
Assignment resources and study materials:
Lynda.com:
If you use CS5: Essential Training: 11
If you use CS6: Essential Training: 9
CSS for Designers: This is a hand coding course that shows the ins and outs of CSS.
I recommend watching weekly tutorials to understand the importance of CSS.
Remember to participate in the weekly Discussion Board. Late Entries are not excepted.
Start Date: 2/18
Due Date: 2/24
|
top
#6 Div Containers
Div = Diversions, are containers like table cells. The main reason why they are more popular then tables is that the downloading speed is faster when using Divs. Tables should only be used as an exception. As you learned when you built tables for the last assignment the way the content will be laid out depends on the arrangements of cells.
Div containers are like cells without being tied to a table. They are like separate boxes formatted and placed by Style Sheets.
It is mandatory to use some kind of container for your content. Otherwise your design is limited to just listing text and images. From now on any web page you build will be based on a layout created with div tags.
The Index page hasn't gotten much attention yet. Usually it is the page with the most design elements to impress and inform your visitors. In this assignment you will take your index page with the short intro about yourself to a higher level of layout and design.
Lets start
by opening your index page.
Go to Insert/Layout Objects/Div Tag
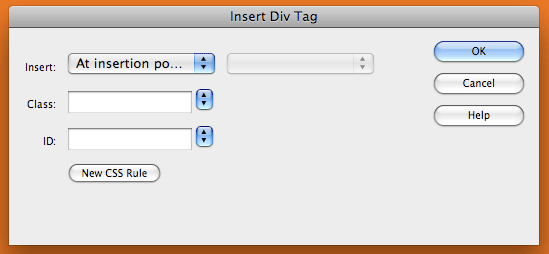
Here you can set your div up for CSS by creating a class or an ID name. I recommend using IDs for div containers and classes for text. IDs, like classes can have CSS rules assigned to them. The difference is that an ID can only be used once per page while you can apply a class multiple times per page. The code below shows the rule applied to the container with the ID "main":
CSS Code Sample:
#main {
height: 100%;
width: 100%;
}
NOTE: A trick is to give the first container a width and height of 100%, which is relative to the browser window. This main container will hold all the other divs of the layout. This is called "nesting". Any div that has the ID name main will follow above rules. You can only have one element with that ID on each page.
Assign an ID name like main or wrapper and open the New CSS Rule Panel.
Click OK.
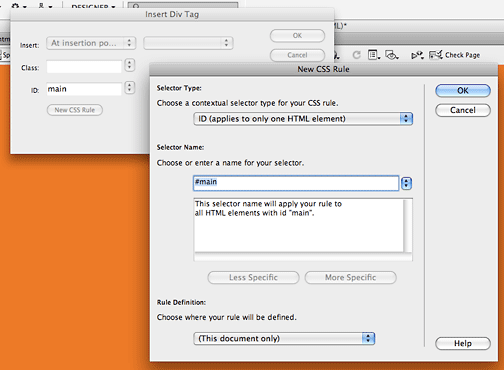
The CSS Definition Window opens. This Div is going to be the main container for all content of this page. Don't apply any other design attributes CSS definition window. Choose the Box category and enter a width and height of 100%.
Select the default text "Content for id "content" Goes Here" and delete.
Go back to Insert/Layout Objects/Div Tag. (Make sure to first place your cursor and clicking inside the main div container) Name the new Div header and click New CSS Rule below. Assign the following design elements:.
Type Attributes: Choose font face, size, color.
Block: Add letter and word spacing.
Background: Choose a background color
Box: This is where you can center the div within the parent div #main.
Do this by defining the Margins in the Box category:
- top:0
- right:auto
- bottom:0
- left:auto
NOTE: This centers the div with the id# content within the div with the id# main
Border: assign a border, look and color
NOTE: Borders are often interpreted very differently in different browsers. I suggest to keep borders as simple as possible.
Positioning: Assign a size in pixels (like 700px x 500px) and a Top Placement of "0".
Congratulations! You created a new div container with the id name header within main.
Insert a third div tag into main by placing your cursor and clicking inside the main container. Give it the id name content and click New CSS Rule below. To this one you will assign more design elements:.
Type Attributes: Choose font face, size, color.
Block: you can carefully add letter and word spacing.
Background: Choose a background color
Box: Enter the size for your Container, use the same width that you assigned to header.
Center the div within the parent div #main following steps above (defining the Margins).
Border: assign a border if you like.
If you followed the instructions your page should look similar to this: sample page
This is a basic Layout based in Div Containers and CSS. You are more then welcome to experiment with Style Sheets, especially Box, Block and Positioning attributes and modify your design. It doesn't have to be centered, can be aligned left or based on % instead of pixels.
Other div layout samples:
Centered layout
Two column layout
Assignment specifications: Post to the Assignment 6 Forum
- Doc name: index.htm
- A layout based on Div containers
- Type design
- Integrated links to about-me.htm and assignments.htm
Assignment resources and study materials:
Lynda.com:
- If you use CS5: Essential Training: 10
- If you use CS6: Essential Training: 5, review 6
- Creating a First Web Site with Dreamweaver CS5 (for all): 4
- CSS for Designers: This is a hand coding course that shows the ins and outs of CSS.
I recommend watching weekly tutorials to understand the importance of CSS.
Remember to participate in the weekly Discussion Board. Late Entries are not excepted.
Start Date:2/25
Due Date: 3/3
|
top
#7 Images
In this Assignment you will learn how to integrate images into your pages, how to collect or create them and how to use them wisely. You will apply images to your index page design. In the last Assignment you have created a layout, considered color for different sections of the page and now you will add content and design by inserting images into some of your containers or defining background images.
F e e l the home page you have created so far. What kind of energy does it carry regarding color and layout? Is the color palette elegant, playful, sophisticated, sporty, funny, real, punk, dark or energizing? Did I miss something? Come up with your own adjectives. Using words to describe a design often helps making choices.
The home page of a web site usually carries the most design features. It is the first impression and the beginning of a relationship - or not. Reasons why people leave your page quickly could be:
- The page takes too long to download. (for example because of a large image size).
- The navigation is unclear and/or links are broken.
- The content is unclear and viewers don't understand the services or information.
Make viewing your pages a good experience. Assure that all the above issues are met consciously.
Including images gives you more room to express the purpose and design of your site.
Here are the most common ways to acquire images to use in your web designs:
- From your phone or digital camera
- From your scanner: hand drawings or photographs
- Taken from the internet ( have to be 70% modified...)
Every scanner works a bit differently. If you scan in a computer lab you can get help. It definitely adds to the originality of your web design if you either scan drawings or create images in Photoshop. You can find images using Google when clicking on the images link. Most of those images have a copyright. For educational and learning sites this is okay but you can't use online images for any commercial use unless you change them more then 70%.
Images used on the web have to be jpgs or gifs, sometimes they are pngs. If you make your own images via scanning or Photoshop you have to save them for the web. Go to "File/Save for Web and Devices" in Photoshop. Once the Save for Web window opens you can choose different settings to reduce the file size. The file size and downloading time are displayed below the image. Save all images into the images folder of your course site. If you use many images you might want to create sub folders.
NOTE: It's also good to understand Image/Image Size in Photoshop. Here you can make images smaller in dimension. Remember that web sites need to have a small file sizes to download and show up quickly in the browser. It is crucial to learn how to create small sized and yet good looking images. This is not a requirement for this class.
Once you found and saved some images you like to integrate into your index layout, open your index page in Dreamweaver.
Foreground Image: Select a div container and go to Insert/Image. From here you browse to your images folder and select the image you want in your Div Container. Foreground images occupy the container so that all other content will be added next to the image. You would use foreground images to add images to content.
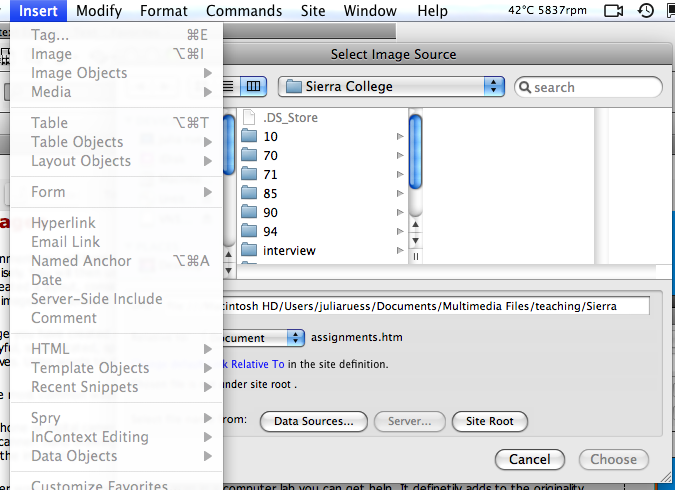
Background Image: Another way to add images is through CSS. You can add background images to your div containers using CSS. Double click the container ID in the CSS Panel and specify a background image + all it's modifications and settings. Background images allow you to place text or foreground images on top.
All the images in this page are defined through CSS Rules: sample page
Assignment specifications: Post to the Assignment 7 Forum
- Doc name: index.htm
- At least three images integrated into the previous layout. Images can be just saved from the web, created in Photoshop or scanned and saved as a gif or jpg.
- Type Design, Colors, borders, positioning
- Integrated links to about-me.htm and assignments.htm, possibly images added to those pages as well.
Assignment resources and study materials:
Lynda.com:
- If you use CS5: Essential Training: 8
- If you use CS6: Essential Training: 7
- Creating a First Web Site with Dreamweaver CS5 (for all):5
- Recommendet:Photoshop for Web Design: 9
- CSS for Designers: This is a hand coding course that shows the ins and outs of CSS.
I recommend watching weekly tutorials to understand the importance of CSS.
Remember to participate in the weekly Discussion Board. Late Entries are not excepted.
Start Date: 3/4
Due Date: 3/10
|
top
#8 Inspiration: Fall in Love with a Master
(This is a 2 week Assignment)
Every Creation comes from an Intention. Your intention is your desire to learn about Design, specifically Web Design. The more time you spend playing in Dreamweaver, reading about design and design elements the more you will be inspired. Inspirations are ideas coming from seemingly nowhere, that you put into form.
For this assignment I want you to find and artist/designer/painter/musician/writer - your choice - whose work has an impact on you. Someone who's work inspires you. He/She needs to be a Master of his/her trade, famous for his /her creations. If you feel like there is no one who has this impact on you, browse the web, search for designers or visit a Library until you find someone that somehow seems interesting to study.
1) Create a Splash page. Draw/paint and scan or create an image in Photoshop, a design that is your reflection on the artist. Insert the image as a background image into a DIV container using CSS. Create a link to the content page. Link to the Splash page from assignments.htm.
2) Create a Content Page
- Write one short paragraph on the life, background and work of this person.
- Write a second short paragraph about the aspect in his/her work that caught your interest. Make it truly personal to you. It can be the way the person uses color, or the way he/she puts things together, or the way this person plays with perspective and millions of other visual and non-visual elements. I want you to locate the aspect that attracted you in the first place to the work.
Put these 2 paragraphs into a web page making layout, color and type choices that are inspired by learning about - and therefore from - this artist. Add samples of work by downloading images from the Internet. Link to this Assignment from assignments.htm. Add a title image (the same way you created your Splash page image)
Assignment specifications: Post to the Assignment 8 Forum